
In the last article, I set up OPNsense as a bridge firewall. “OPNsense Bridge Firewall(Stealth)-🛡Invisible Protection” Before you read this article, you must first take a look at my previous article above, otherwise you will not quite come out of it. In this article, I’ll install Suricata on OPNsense Firewall to make the network fully secure.
🐿What is Suricata IDS&IPS?
Suricata is a free and open source, mature, fast and robust network threat detection engine.
🔔Intrusion Detection System
Intrusion Detection System (IDS) is a system that monitors network traffic for suspicious activity and issues, alerts when such activity is detected.
🚫Intrusion Prevention System
Intrusion Prevention System (IPS) is a network security/threat prevention technology that examines network traffic flows to detect and prevent vulnerabilities.
OPNsense muss auf Bridge umgewandelt sein!
If you have the requiered hardwares/components as well as PCEngine APU, Switch and 3 PCs, you should read first article before you start.
📡Install the entire network in VMware
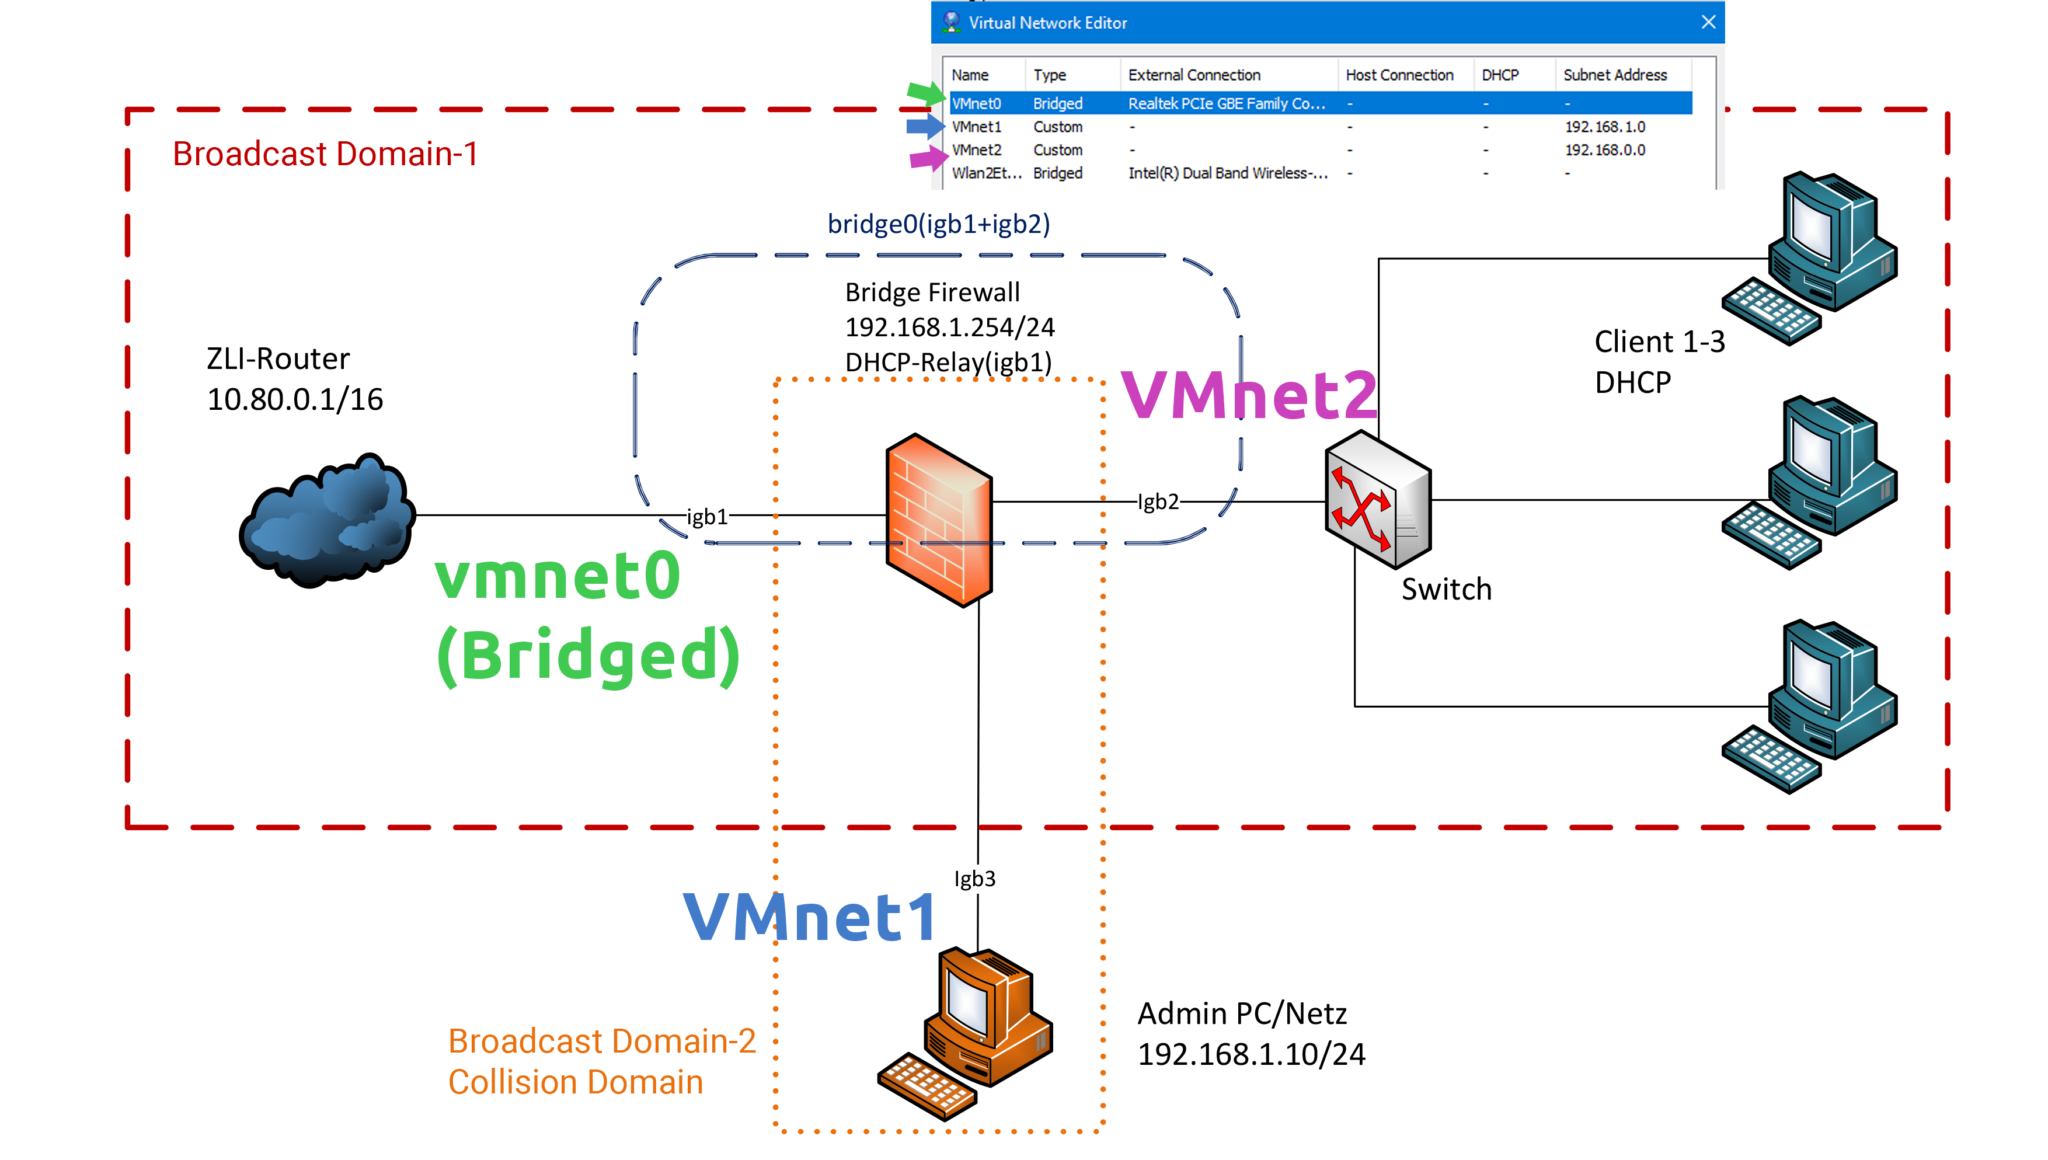
In the first article I was able to realize the scenario with hardwares/components as well as with PCEngine APU, switches. But this time I am at home and I only have one computer :). That’s why I have to realize it with virtual machines. Below I have drawn which physical network how I have defined in the VMware network. Because I’m at home, the old IP addresses from first article are not the same. I list below the new IP subnets for virtual machines:
WAN (Vmnet0 – Bridge) -> 192.168.0.0/24
DMZ (Vmnet2) -> 192.168.0.0/24
LAN (Vmnet1) -> 192.168.1.0/24
🔒VMware Custom Network
In the Virtual Network Editor I have the network cards “vmnet1 and vmnet2” as a custom. The difference between custom and host-only networks is that in the host-only network there is a virtual switch that connects all virtual machines to each other. For security reasons, I do not want that. You can learn more about VMware networking types with the following article.

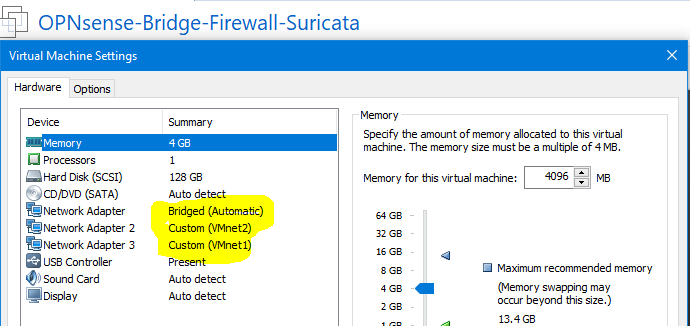
You must first connect all three network cards to OPNsense Firewall Virtual Machine. (See below picture).
I have created following three virtual machine
- Firewall OPNsense -> Vmnet0 (Bridge)
- Ubuntu -> VMnet1 (Admin PC)
- Kali Linux -> VMnet2 (Client. Because I have Windows installed on my laptop, I can not comfortably implement attack scenario, so this time I will attack from DMZ to WAN with Kali Linux)
- Windows -> Physical Laptop (in Bridged network)
⚙️Suricata Installation on OPNsense
Active WAN IP-Address
First, we need to enable the IP address for WAN network card so we can contact world outside and install the necessary packages. I enabled DHCP for WAN so I automatically get an IP address from DHCP Server.
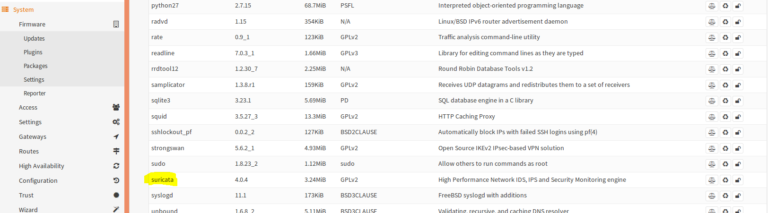
In OPNsense under System > Firmware > Packages, Suricata already exists. You just have to install it.
📥Install Suricata Packages
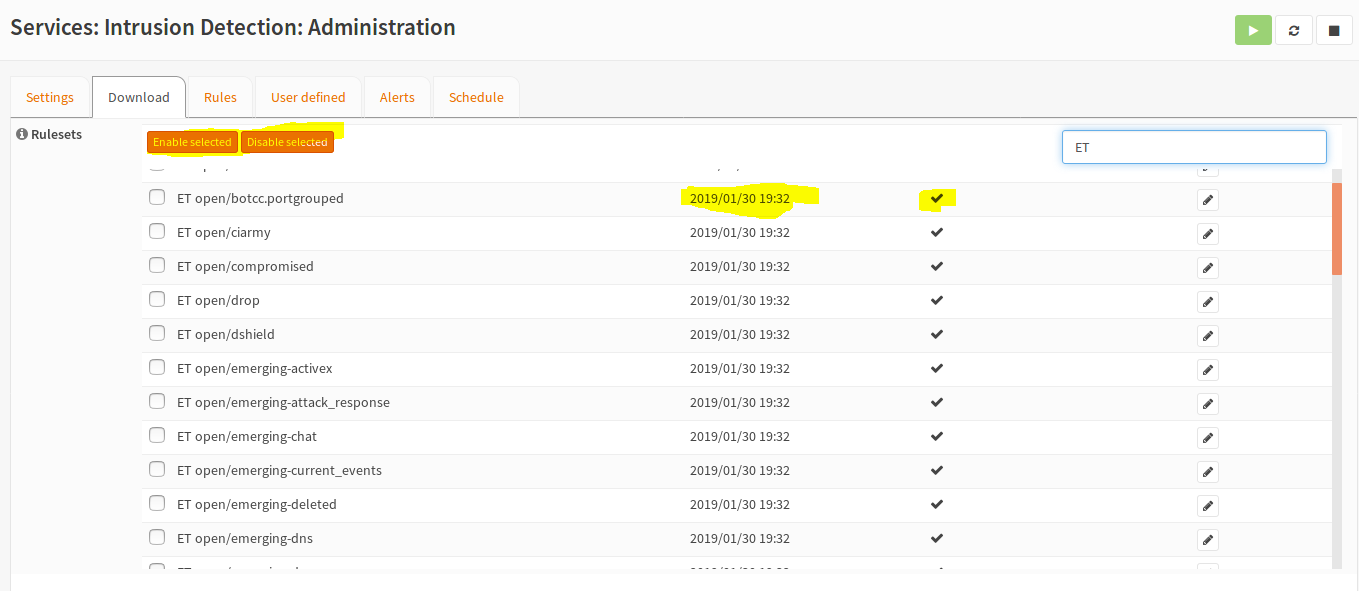
Now we have to go to Services > Intrusion Detection > Download download all packages. They don’t need that much space, so I recommend installing all packages. But if you don’t want to download everything, in my case you have to download all “ET – Emerging Threats” and mark them as “Enable“.
After you download and activate the extensions, you can turn off the IP address of WAN again.
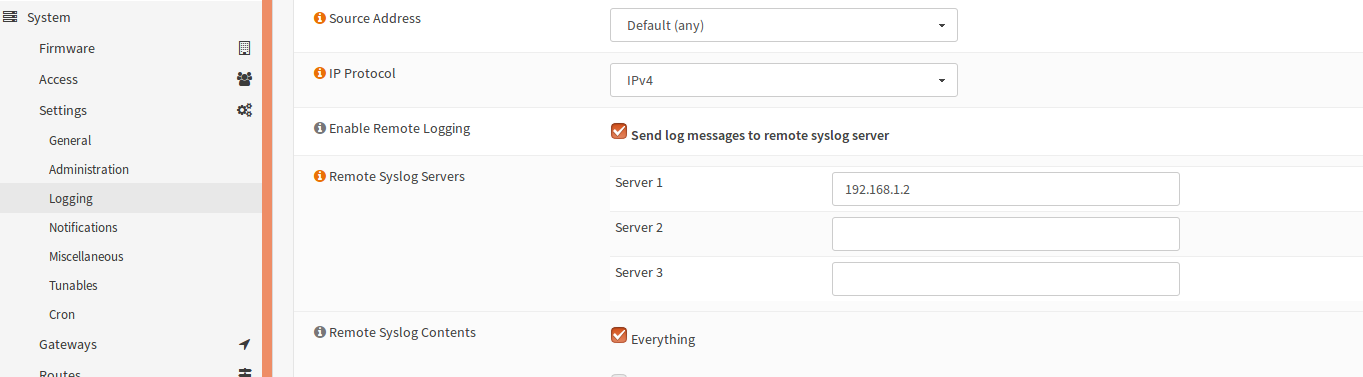
📈Setup Remote Logserver
If you want to view the logs of Suricata on Administrator Computer remotly, you can customize the log server under System>Settings>Logging.
👨🏿💻Attack Scenario – SYN Flood
To understand the differences between Intrusion Detection System and Intrusion Prevention System, I’ll run a test scenario in Kali-Linux on the DMZ network. You have to be very careful on networks, otherwise you will always get different error messages. Because these are virtual machines, we have to enter the IP address manually. In this case is the IP address of my Kali -> 192.168.0.26
📦What is Scapy?
Scapy is a powerful interactive package editing program. Scapy is able to fake or decode packets from a large number of protocols. It can also send the packets on the wire, capture, assign requests and responses, and more. It can easily handle most classic tasks such as scanning, tracerouting, probing, unit testing, attacks, or network discovery. I use Scapy for the test scenario. Installing Scapy is very easy. You just have to install and run repository with git.
git clone https://github.com/secdev/scapy
cd scapy
./run_scapy
After you have installed Scapy, enter the following values in the Scapy Terminal. The commands I comment next with // signs. You do not have to write the comments.
e=Ether(src=RandMAC(),dst=“30:ec:32:4b:a2:ad“) // src= Create a random MAC address as Source. "dst" is destination, in my case Mac address from my laptop.
i=IP(src=RandIP(),dst=“192.168.1.2“) // As Source IP Random IP Address. Destination is IP from my laptop.
t=TCP(sport=random.randint(45000,59385),dport=22,flags=[3]) // Create TCP packet, "sport" is our source port and it is random dynamic ports. "dport" is Destination Port and it is SSH Port. As TCP-Flag I give 3 (SYN-ACK).
p=e/i/t // summarize packages
sendp([p]*100) //Send the Packages *Times

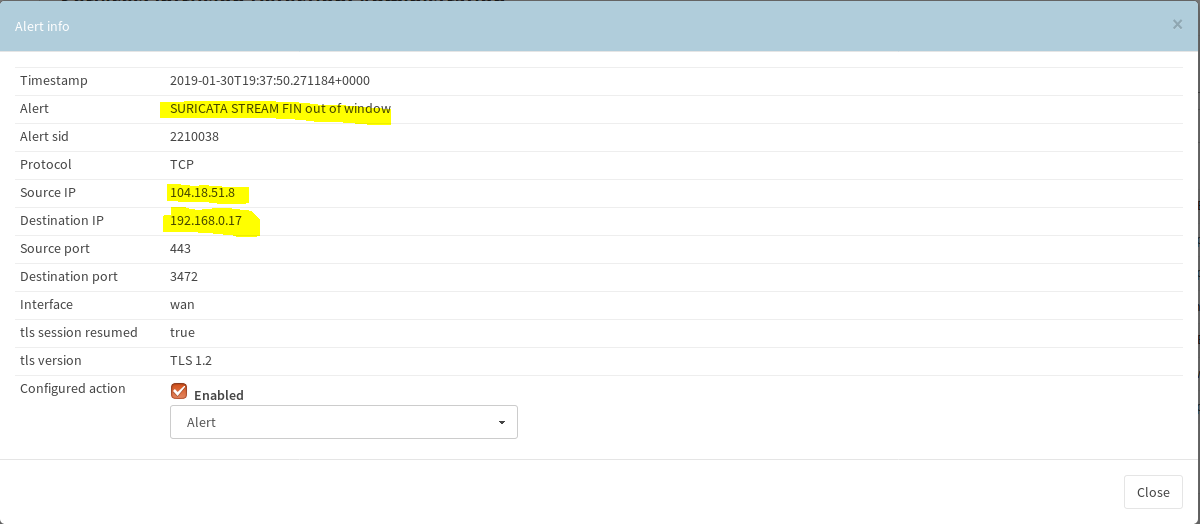
While in Suricata SYN-FIN rules are in alert mode, the threat is not blocked and will be only written to the log file. So the victim is completely damaged (just overwhelmed), in this case my laptop. The logs are stored under Services> Intrusion Detection> Log File.
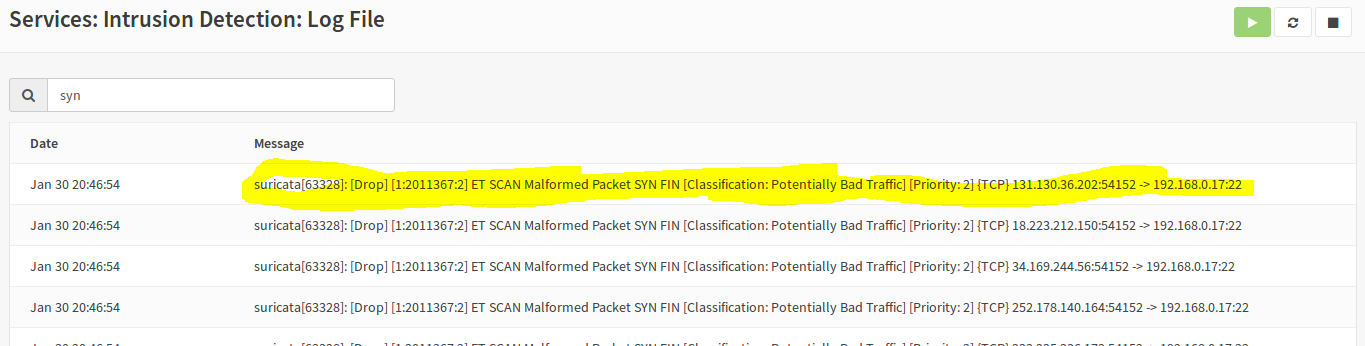
Now we activate “Drop” the Emerging Threats SYN-FIN rules and attack again.

After we have the rules set on “drop”, we get the messages that the victim is under threat, but all packages are blocked by Suricata.
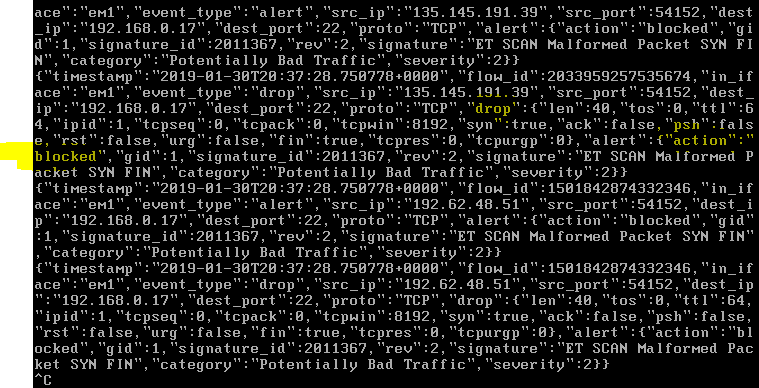
The logs can also be obtained in my administrator PC (vmnet1) via syslog protocol. I start the Wireshark on my Admin PC and analyze the incoming Syslog packages.

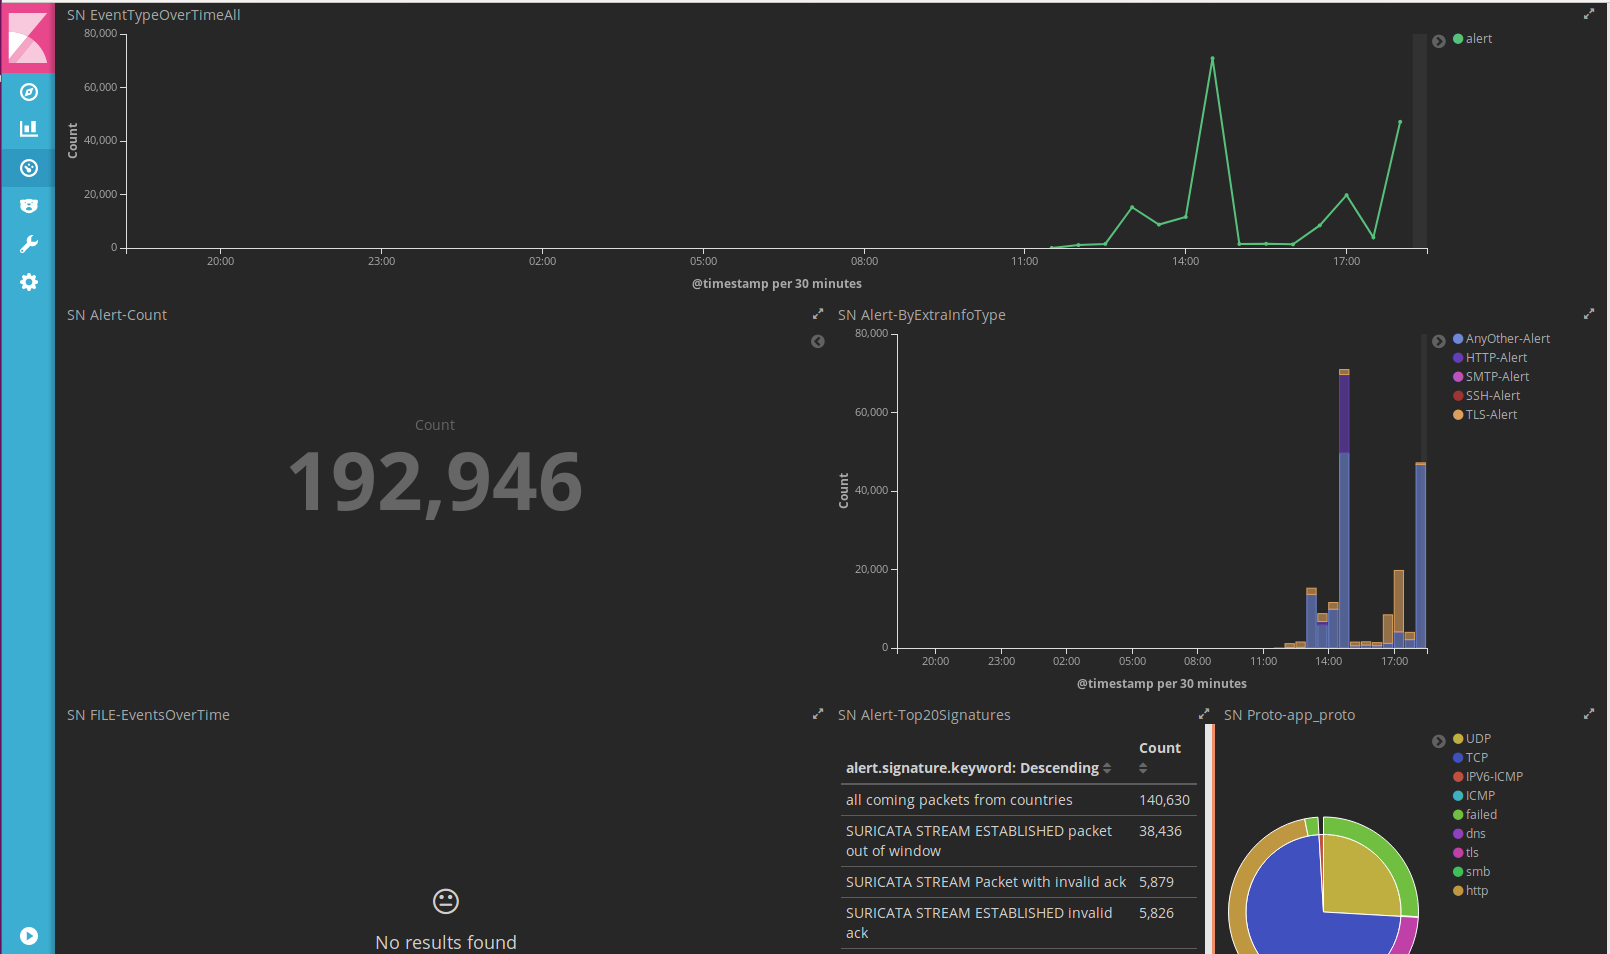
So you can open the Wireshark in the victim-PC and sniff the packets. There you can also see the differences between alert and drop. So far I have told about the installation of Suricata on OPNsense Firewall. If you have any questions, feel free to comment below. By the way, in next article I will let the logs of Suricata with Kibana + Elasticsearch + Logstash and Filebeat in graphics mode. An example Screenshot is down below:
nice info, I hope you realease new article about OPNsense.. and I wait for your next article about the logs of Suricata with Kibana + Elasticsearch + Logstash and Filebeat in graphics mode with OPNsens,. Thanks
Hi, thank you for your kind comment.
lately i don’t have that much time for my blog, but as soon as i have the opportunity, i’ll try to set that suricata + elasticsearch combo.
What you did choose for interfaces in Intrusion Detection settings?
Hi, sorry forgot to upload that. Choose enable first.
If you want to block the suspisious request automatically, choose IPS-Mode enabled, otherwise suricata just alerts you.
Then choose the WAN Interface, because it’s the gate to public network.
Nice article. I had no idea that OPNSense could be installed in transparent bridge mode.
I’ll probably give it a shot as I currently use pfSense + Untangle in Bridge in two separate Qotom mini PCs. My plan is to install Proxmox in one of them and spin a VM for pfSense (or OPNSense, who knows) and another VM for Untangle (or OPNSense, who knows).
Hi, thank you.
It’s worth to mention that when m0n0wall was discontinued (in 2015 i guess), the creator of m0n0wall (Manuel Kasper) recommended that his users migrate to OPNSense instead of pfSense.