To secure your own network, there are many options to choose from. But one option is indispensable for every company and private user: a firewall. The firewalls are currently everywhere. The Firewall is mostly known from Windows Firewall, but this article is not about built-in firewalls, such as the Windows Firewall or uncomplicated Firewalls, rather a software firewall installed on hardware, like OPNsense or Pfsense, respectively OPNsense Bridge Firewall.
I use now OPNsense. Its new, that’s why about OPNsense there are not so much Tutorials, and the most annoying thing, when you search for OPNsense, the recommendation of Google 🙂 = Did you mean Pfsense?
What is a Firewall?
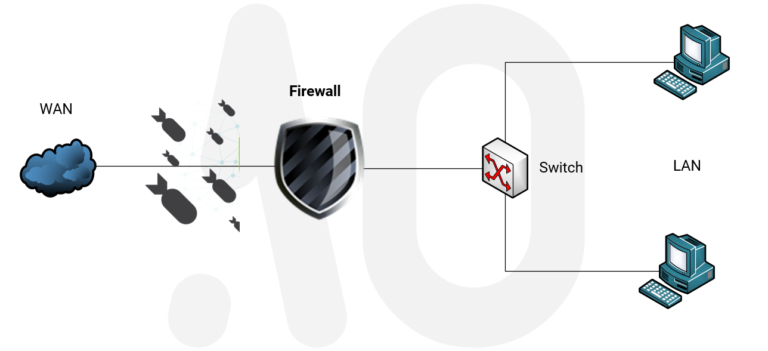
Easily explained; A firewall is a device or application that analyses packet headers and filters by protocol type, source address, destination address, source port, and / or destination port based on defined rules. Packages that do not comply with the policy will be rejected.
What is OPNsense?

OPNsense is a open source Firewall distribution based on FreeBSD. OPNsense was launched in 2015 as a fork of Pfsense. In 2004 Pfsense also started as a fork of m0n0wall. In addition to the Firewall there are also DHCP servers, DNS servers, VPN, etc. available. You can install it on both a physical server and a virtual machine.
🌉What is a Bridge?
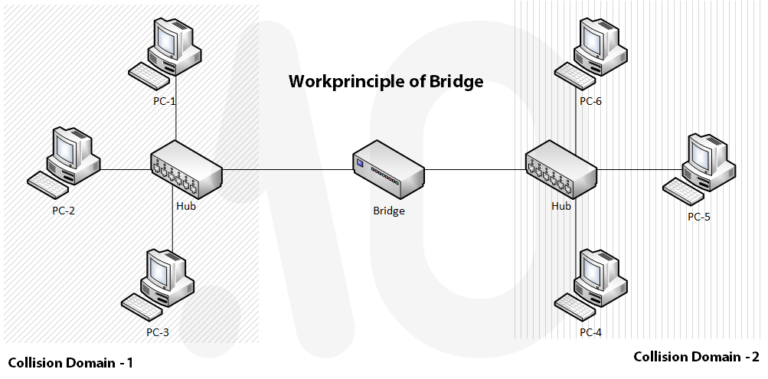
First, we need to know what a bridge is to get to know the Bridge Firewall a bit more. The bridge is also called “simple switch”. The bridge separates two collision domains.
A bridge learns the MAC addresses used in the local network and remembers which port (interface, port) is used to reach the associated computer. If the bridge receives a packet whose destination MAC address it knows, it only forwards the packet to the appropriate network card. This avoids unnecessary transfers. However, if the bridge does not know the destination MAC address, it sends the packet to each port. Since the bridge works on Layer 2, it does not need an IP address.
In short; In the past, the switches were too expensive. That’s why the bridges were developed, but nowadays they are almost no longer needed.
More about Switches: How does a Switch work? (Animated)
👻What is a Stealth-/Bridge Firewall?
The firewalls (if not configured) work on the third (network) to seventh (application) OSI layer. But a bridge firewall uses targeted forwarding of network packets on the second (Data Link) OSI layer. If you change your firewall to a bridge firewall, your firewall will filter the MAC addresses like a bridge. For a firewall you need at least two network cards, but for a bridge firewall we need at least three network cards. One is used as a WAN (Wide Network Area), the other as a DMZ (Demilitarized Zone). WAN & DMZ will create a virtual network bridge. Additionally you need a LAN (Local Network Area) to control the firewall.
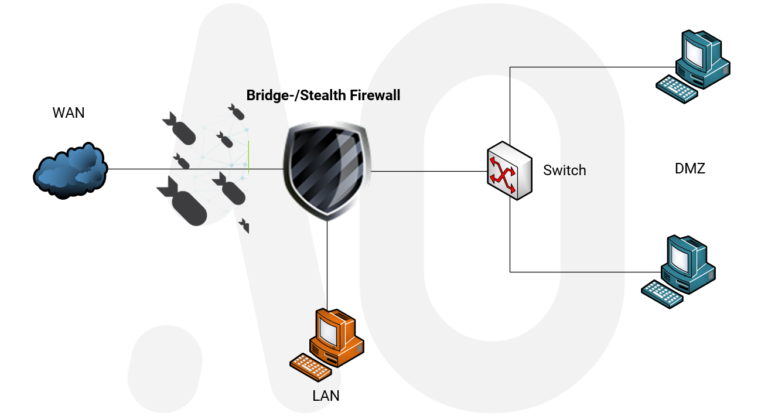
OPNsense – integrate Bridge Firewall into the Netzwerk
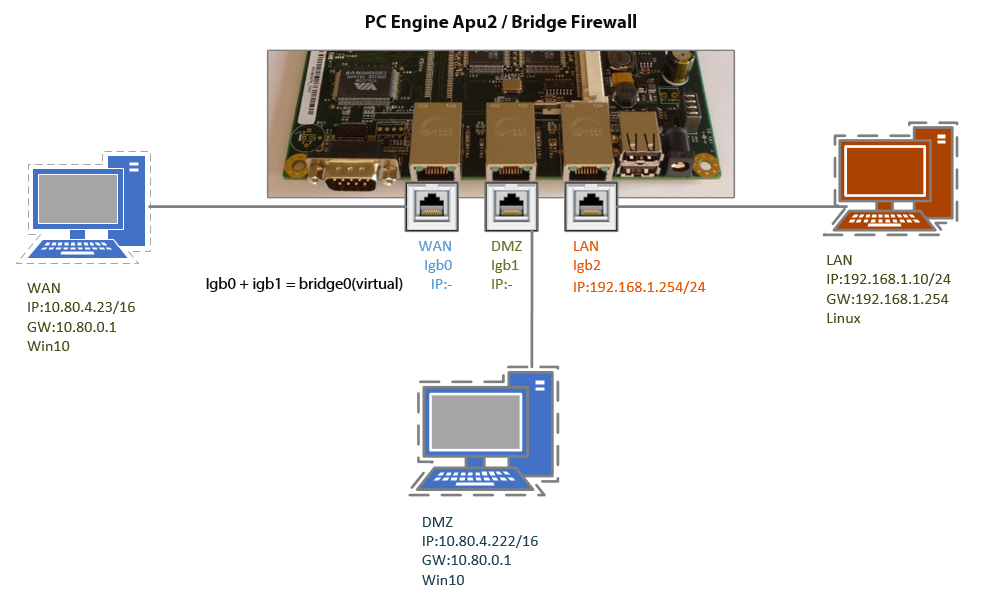
As I explained above, the bridges do not have IP addresses. How does it work like a firewall? With a bridge you can only split two collision domains, so it still serves in the same broadcast domain. This means that the bridge firewall filters network packets that are in the same broadcast domain. It may sound a bit complicated, but below I have a network diagram for it.
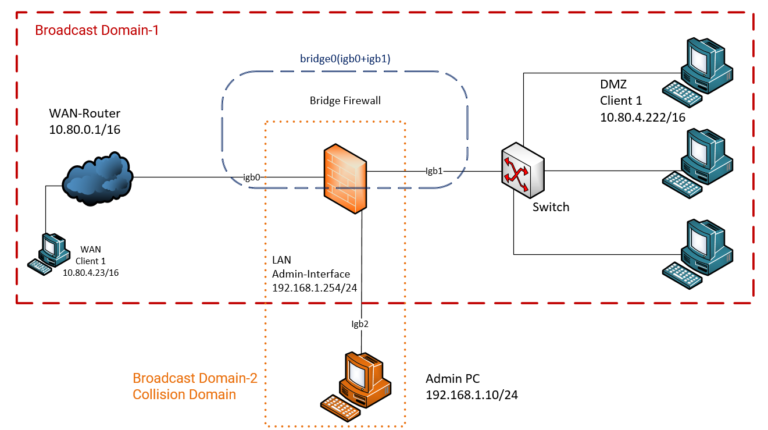
In the broadcast domain, there is a WAN router, which also serves as a DHCP server. Client 1, located on the WAN, gets its IP configuration from the WAN router. The clients that are in the DMZ also receive their IP configurations from the WAN router. So we can enable DHCP Relay in OPNsense too, so the clients that are in the DMZ get their IP configuration from OPNsense (Bridge Firewall). But for this you have to give an IP to Firewall, although this is not recommended. From igb0 and igb1 I have created a new (virtual) network card bridge0 . (Below, I will explain this in more detail).
As you can see, the network card does not have an IP address because we do not need it (because it is a bridge). I named the network where the clients are, DMZ, because its clients and the WAN clients are on the same network. The secure network is actually the admin network, so the network where the administrators are located is the LAN.
Install OPNsense on PCEngine Apu2
As hardware, I use a PCEngine Apu2. This device has 3 network cards. I installed OPNsense Firewall on it. There is already an instruction on the official site (“Install OPNsense“), so I will skip this step. If you also got a PCEngine, I explained the recommendations here: Configure Router to Access Internet
Change OPNsense into Bridge Firewall
You can find instructions on the official site of OPNsense(“Transparent Filtering Bridge“). I will still show my screenshots below.
Warning!
During the configuration you will be asked to apply your changes several times, but this may affect the current connection. So do not apply until it’s done! You must save your changes for each step.
To disable outbound NAT, go to Firewall -> NAT -> Outbound: Disable outbound NAT rule generation

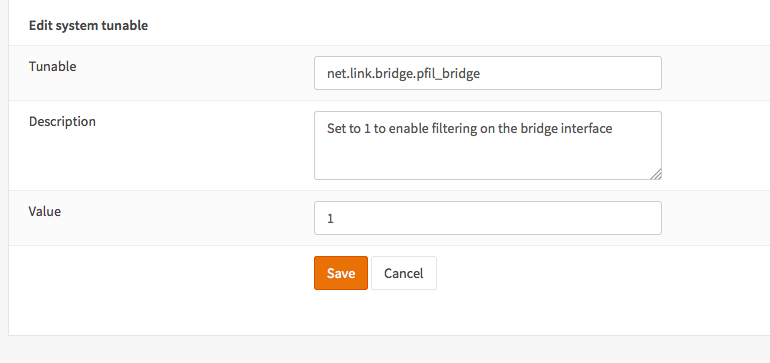
Enable filtering bridge by changing net.link.bridge.pfil_bridge from default to 1 in System -> Settings -> System Tuneables
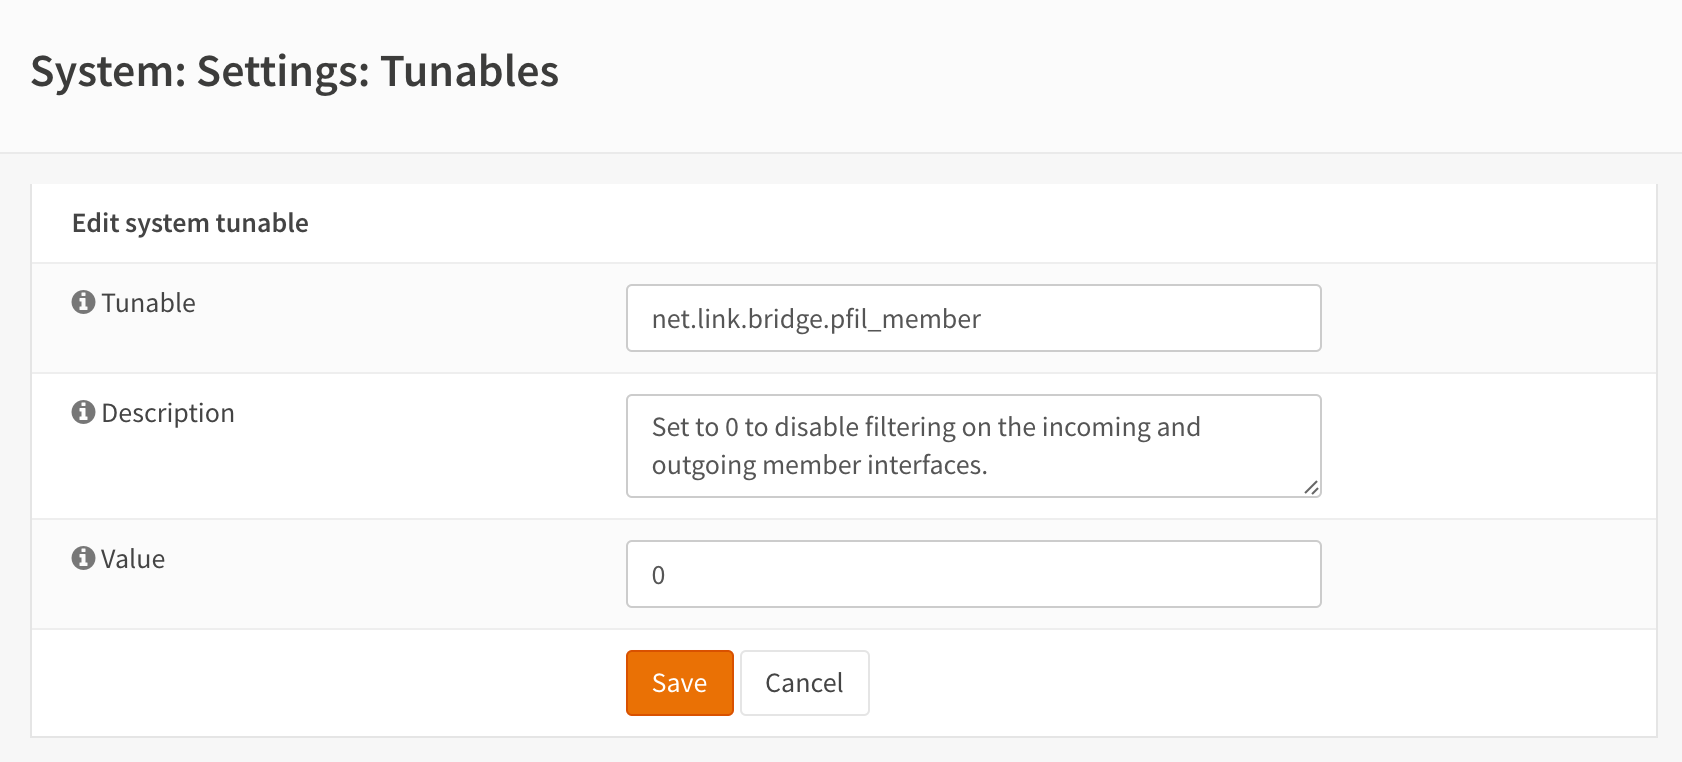
And disable filtering on member interfaces by changing net.link.bridge.pfil_member from default to 0 in System -> Settings -> System Tuneables
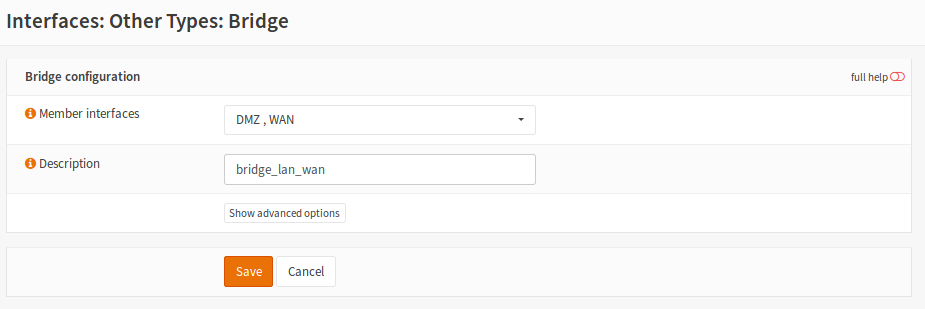
Create a bridge of DMZ and WAN, go to Interfaces -> Other Types -> Bridge :Add Select LAN and WAN. (The name of the third network card is by default OPT1)
Go to Interfaces -> Assign -> Available network ports , select the bridge from the list and hit +.

For the WAN interface we need to disable blocking of private networks & bogus ip’s.
Goto Interfaces -> WAN and unselect Block private networks and Block bogon networks.

To disable the DHCP server on LAN goto Services -> DHCP Server -> LAN and unselect enable. Though I disabled the DHCP Server because I’m the only Administrator.

Add the allow rules for all traffic on each of the three interfaces (WAN/LAN/DMZ).
This step is to ensure we have a full transparent bridge without any filtering taking place. You can setup the correct rules when you have confirmed the bridge to work properly.
Goto Firewall -> Rules and add a rule per interface to allow all traffic of any type.

Now remove the IP subnets in use for DMZ and WAN by changing the interface type to none. Goto Interfaces -> DMZ & Interfaces -> WAN to do so. Be they both have no IP.

Now add an IP to the interface you want to use to configure the Bridge. Go to Interfaces -> LAN activate the interface and set the IP/netmask(192.168.1.254/24). If finished, following interfaces should be available:
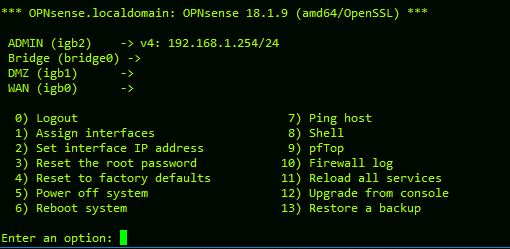
Now connect a PC to the Admin Socket (LAN). On my network diagram, it would be igb2 . Give an IP for your Admin-PC in the same Subnet as LAN Interface. Try to ping 192.168.1.254 LAN-Interface. If you get error, try to find out the reason according to OSI-Modell Layers. Don’t forget ping(icmp) is on third layer. You will get from ICMP different errors. Every Errors means something else.
Destination Host Unreachable: The host you are trying to ping is not powered off or on the network.
Request Timed Out: The ping command timed out because no response was received from the host computer. If you work in big Network, you can increase the waiting time with ping -w, but this is not necessary for small networks.
Unknown Host: The IP Address or Host Name does not exist on the network or the destination host name can not be resolved. Verify the name and availability of DNS servers, which you don’t need now.
No route the host: Gateway Table is empty. To add a gateway, take a look at the following Article: Configure Router to Access Internet (Serial Cable-SSH) LAN🛡WAN
After you solve the problem, open a browser and enter the IP address of the interface”192.168.1.254″. Then you may control the bridge firewall.
That’s all you have to do for a bridge firewall. How can you control it? Close your desired ports and try to reach the DMZ from the WAN. For example, if I close port 53 (DNS) on igb1 , then the clients that are in the DMZ can not resolve names.
In the next article I will set up Suricata – IPS (Intrusion Prevention System) and IDS (Intrusion Detection System) on the bridge firewall and monitor the logs with Elasticstack on a syslog server.
Gruezi Baruyr!
Thanks for your article. Quick Q: on the OPNSense website they assign an ip to the bridge (opt1) interface. Is that an error as you seem to assign it to the LAN interface.
https://docs.opnsense.org/manual/how-tos/transparent_bridge.html
Good articles – appreciated!
Hi Pascal, as you see in Broadcast Domain 2 (LAN) the Bridge Interface has an IP-Address. Since the Administrators are the only participents of the LAN Network, it’s no problem.