Bind9 DNS Server allows you to replace IP addresses of individual machines by a name. You can also assign several names to the same computer. For example, your Pc is a Webserver as well as Mailserver. You can assign Webserver “azizozbek.ch” and Mailserver “mail.azizozbek.ch”. If you wanna work with Domain Names instead of IP’s and you are a Linux User, this Article Bind9 DNS Server Configuration on Ubuntu 16.04 is for you. If you are a Windows User, I’ll post an other Article about Windows Server 2012 R2 DNS Configuration.
🖥What is DNS – Domain Name System?
Each computer on the Internet is assigned a number, called “IP address,” which is unique(but can change over time).
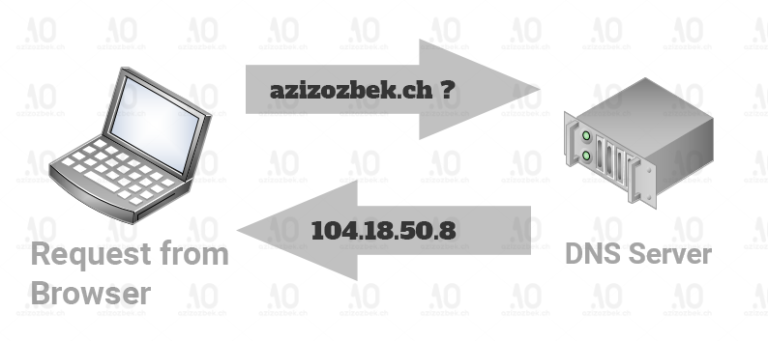
For example, my website has “azizozbek.ch” the IP address 104.18.51.8. If you open on Windows the cmd-console or on Linux a Terminal and write nslookup azizozbek.ch or ping azizozbek.ch, you will get my website’s IP. Normally you can reach my website through a browser via http://104.18.51.8/ or with a terminal curl 104.18.51.8, But I use Cloudflare for DNS Server and direct Ip address is not allowed.
Since such numbers are difficult for us to remember and IP addresses may change, DNS(Domain Name System) was developed. This system assigns to IP addresses an easier-to-read name called a Domain.
The IP address 104.18.51.8 is assigned the domain azizozbek.ch So if you type azizozbek.ch into your browser, that name will be converted to 104.18.51.8 in the background, with Domain Name System. For example, the Address Book in your Mobile Phone. You want to call your Friend. What if your Friend has two numbers? You have to type them everytime, if you didn’t save him in your address book, or even his number can change. That’s why you don’t type his number, you type his name, and phone will search for the number in address book, which has the assigned for this name.
What is Bind? – Berkeley Internet Name Domain
BIND is an open source program package for name resolution in the domain name system(DNS) for Linux Operation Systems. The software originated in the early 1980s at the University of California at Berkeley. that is why the name BIND stands for Berkeley Internet Name Domain. More about Bind you visit the official Website.
Install Bind9 on Ubuntu 16.04
🛠Update System & Install Bind
First of all you should update and upgrade your System, so you can remove this from your possible errors list, if there will be an error 🙂
sudo apt update -y - sudo apt upgrade -y
If you are using less then 16.04 Version, you should write “apt-get”. After that you can install Bind9 Package.
sudo apt-get install bind9 bind9utils
After successfully installation, lets edit configuration files. First set the BIND to IPv4 mode. sudo vi /etc/default/bind9

Configure Primary DNS Server
My Goal – Bind9 DNS Server Configuration
I will have two Ubuntu 16.04 LTS Virtual Machine(ns and client). One is gonna be DNS Server, the other one is Client.
| Host | Role | FQDN* | IP Address |
|---|---|---|---|
| ns | Primary DNS Server | ns.dns.azizozbek.ch | 192.168.1.130 |
| client | DNS Client | client.dns.azizozbek.ch | 192.168.1.131 |
*FQDN = Fully-Qualified Domain Name
First of all change the directory to Bind cd /etc/bind/
Open the named.conf.options, this is where we are gonna define list of clients that we will allow recursive DNS queries from same network.

Than open named.conf.local, you might have nothing in this file. The examples are in named.conf.default-zones. You can just copy from there in to named.conf.local file. Than change them, or write yourself. It should looks like following:
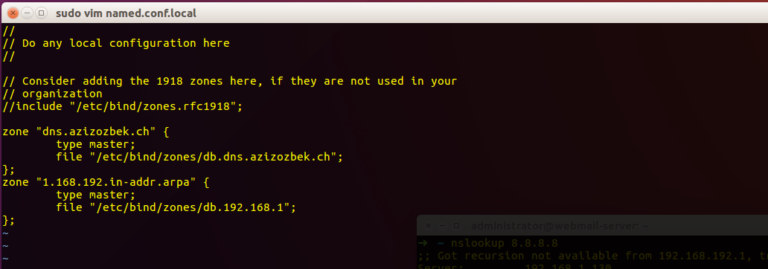
The zone names are depents on you. I choose “dns.aziozbek.ch” for this tutorial. Maybe you can use a League name. For example “laliga.local“. So you can assign to client the Football Club names, and remember them easily. If you are configuring the DNS Server for big Company, you can choose “fifa.local” than you assign for departments the Country names, for Sectors City of Country, for Levels Football Clubs of City and for end-user Clients the Footballer Names.
📝Create Forward Lookup Zone
First create a Folder for Zones. sudo mkdir /etc/bind/zones. You can copy the db.local in Zones directory to create a Forward Lookup Zone.
cp db.local zones/db.dns.azizozbek.ch
DNS Resource Records
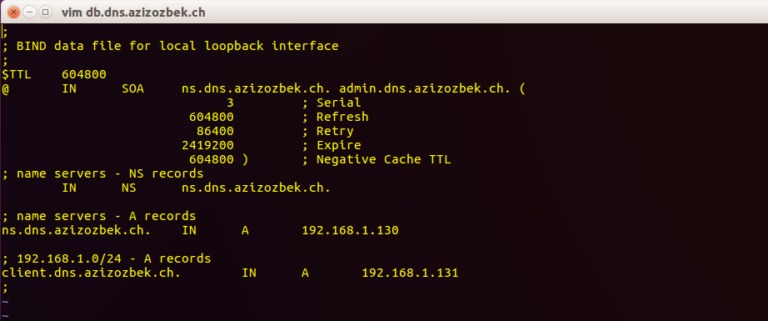
$TTL : (Time To Live) Specifies the default TTL value. The process we specify here in seconds tells how long the other DNS servers should cache the records of this domain. So here we are telling how long a DNS server needs to keep our response in its cache when we query our dns server for any records from dns.azizozbek.ch. In this way, the relevant dns do not ask us to come back again and again for the same record, not both himself and us:
SOA : This line describes the SOA (Start of Authority) record for the domain step. SOA is the main register where global parameters belonging to a domain are specified and one SOA record for each zone is required.
The “@” sign on this line indicates the domain name itself. “IN” is the class of the record, “SOA” is the resource record (rr), master name server is the domain name of “ns.dns.azizozbek.ch”, and “admin.dns.azizozbek.ch” e-mail address. (This email address uses . instead of @):
- Serial : is the whole non-signed 32 bits. This is the serial number to increment with each change of file. It allows the secondary server to reload the information they have. The general purpose is to format it this way YYYYMMDDXX, either for the first amendment 01/04/2007 -> 2007040101, for the second 2007040102.
- Refresh : defines the data refresh period.
- Retry : if an error occurs during the last refresh, it will be repeated at the end of time Retry
- Expires’: the server is considered unavailable after the time expires.
- Negative cache TTL’: set the lifetime of a NXDOMAIN response from us.
NS: information on behalf of nameservers for the domain.
MX: information on the mail server. Many can be defined. Thus, it is possible to give them a priority, assigning a number. The lower the number, the higher the priority.
A: associates a host name to an IPv4 address (32 bits)
AAAA: associates a host name to an IPv6 address (128 bits)
CNAME: identifies the canonical name of an alias (a name that points to another name)
PTR: This is simply the inverse resolution (the opposite of type A).
Forward Lookup Zone file looks like the following:
📝Create Reserve Lookup Zone
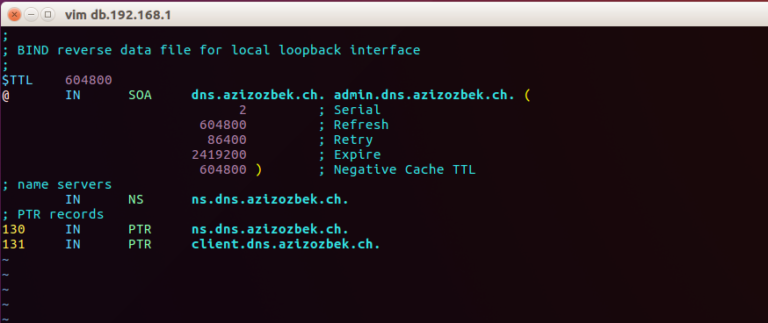
Reverse Lookup Zone file is, where we define DNS PTR records for reverse DNS lookups. For Example, when the DNS receives a query by IP address, “192.168.1.131”, it will look in the reverse lookup zone file to resolve the corresponding FQDN, in this case “client.dns.azizozbek.ch”.
✔️Check BIND Syntax Error
Check with sudo named-checkconf, if there is a syntax error. If not, nothing will be show up. You can also check Forward Lookup Zone and Reverse Lookup Zone with command
sudo named-check
sudo named-checkzone dns.azizozbek.ch db.dns.azizozbek.ch // if you aren't in bind path, give the full path
sudo named-checkzone 1.168.192.in-addr.arpa db.192.168.1
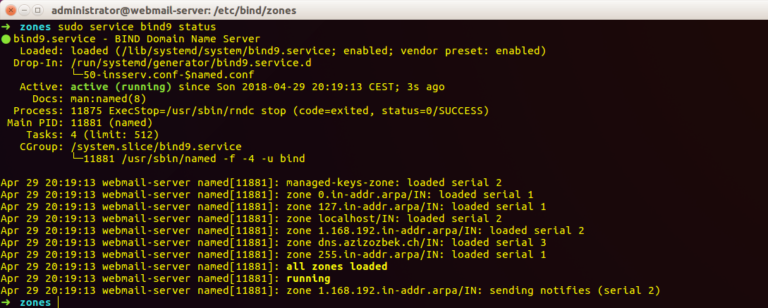
After checking out, restart Bind
sudo /etc/init.d/bind9 restart
sudo /etc/init.d/bind9 status //check out if it works
⚙️Configure Client
Actually you don’t have to configure anything from Client Side. If you have a DHCP-Server just add the Nameserver “ns.dns.azizozbek.ch” and request DHCP Infos again on Client.
dhclient -r
dhclient ens33 // give here your interface name
But in my case, i don’t have any DHCP-Server(I have actually, but its the Router, which i can not configure) and my nameserver is already exists. i have to change some stuffs, so it works correctly. First change “resolv.conf”. With Following file you can change it permanently. If you wanna change the file directly use sudo vi /etc/resolv.conf, write same lines down below on screenshot.
sudo vi /etc/resolvconf/resolv.conf.d/head
sudo resolvconf -u // regenerate new resolv.conf


If you have a private FQDN like “laliga.local”, you are done. Check out with nslookup
nslookup 192.168.1.131
nslookup client
I’m using a Public FQDN “ns.dns.azizozbek.ch“. If you type nslookup client, by default request goes first to /etc/hosts file, than to /etc/resolv.conf to find the DNS Server. I can assign the IP Addresses in /etc/hosts file, but it’s not a good idea. I’ll change the order of Request in /etc/nsswitch.conf
nsswitch.conf
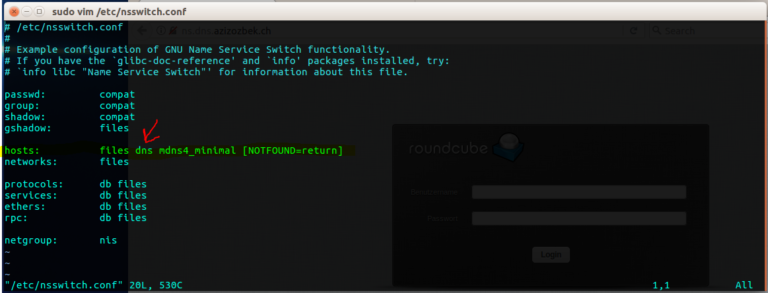
I have installed on my Ubuntu(ns.dns.azizozbek.ch) a Web Server (apache), if i type in URL “ns.dns.azizozbek.ch”, i will get my local Webserver. If i type “azizozbek.ch”, the original Website will show up, cause i changed the order.

It was everything about Bind9 DNS Server Configuration 🙂 I’m not a Expert on Domain Name Server, but if you get an Error, you can comment below.
